Tuesday, February 28, 2012

Easy Crockpot Mac&Cheese

I am really into using our crock-pot these days.

Since Garrett and I have completely opposite schedules, I work at 5:30 am and get home around 10:30am and he usually isn't home until 6:30 or later, a good old fashioned crock-pot meal is nice! I can get it going when I get home and it'll be ready when he walks in. The best part is, I barely have to do anything but the meal comes out as if I had slaved in the kitchen for hours. Score! : )

Last week I shared a crock-pot BBQ Chicken recipe. It was delicious and really great with this mac&cheese recipe I am posting today. Throw in some mashed potatoes and it would be the best comfort food meal ever!

What you need:

1 1/2 Cups Milk
1 12oz. Can Evaporated Milk
1/4 Cup Unsalted Butter, Melted and Cooled
3 Eggs
3 Cups Shredded Cheese
1/2 Lb Elbow Macaroni, Slightly Cooked and Drained ( Cook macaroni for about five minutes until it is tender but not all the way cooked)
Salt and Pepper to Taste

What to do:

Spray the inside of your crock-pot with cooking spray. Combine milk, evaporated milk, eggs, butter and salt in the crock-pot and mix until smooth. 

Add the shredded cheese and macaroni. Sprinkle with black pepper. Stir to coat with previous mixture.

Sprinkle some grated cheese on top as well for a nice cheesy topping! Cover and cook on high for 30 minutes. After 30 minutes is up, reduce to low and cook for 2 to 2 1/2 hours.

So, I want to apologize for the pictures I am about to add. If you know me you know that I usually take a TON of pictures. Well, this one time I took only about five pictures. And none of them turned out too great. These two were the best I had! 


Just imagine this displayed on a really cute dish next to some BBQ Chicken and you will have the mental picture of what I wanted my pictures to look like! : )

Hope everyone is having a great week! I am already ready for the weekend. And the next Bachelor episode. Even though Ben is making me a little mad!

 Is anyone else watching this season??

Saturday, February 25, 2012

Easy Crockpot BBQ Chicken

I don't know about y'all, but any recipe that deals with simply throwing something in my crock-pot is an automatic favorite! The food usually turns out delicious and all you have to do is throw it in there and let it cook while you do nothing start making dessert. Now that's my kind of cooking!

I found this recipe on Pinterest, of course. Where else?
It turned out yummy and was really easy to make, you can just throw the chicken breasts in there frozen! 

What you need:

4-6 Boneless, Skinless Chicken Breasts
1 Bottle BBQ Sauce
1/4 Cup Vinegar
1 Tsp. Red Pepper Flakes
1 Tsp. Garlic Powder
1/4 Cup Brown Sugar

What to do:

Mix all ingredients (except chicken) together. Place chicken into crock-pot and pour sauce over it. Cook on low for 4 to 6 hours. That's it! 

*I would suggest using a medium sized crock-pot if you own one so that the chicken stays submerged in the liquid, otherwise it may come out a bit dry.


We ate ours with homemade mac&cheese, recipe coming soon, but mashed potatoes and green beans would be yummy too!

We hope y'all are all having a great weekend! It is Denver Restaurant Week here which means a ton of restaurants are having 3 to 4 course meals for $52.80 for two people! Garrett just informed me that 5280 is Denver's elevation, pretty clever. We are thinking about trying out Texas De Brazil...have any of you ever eaten there and if so what did you think?

Linking up here:

Six Sisters' Stuff
Country Momma Cooks
Joy in the Jumble
Two Sasters
Simply Sweet Home
One Artsy Mama
The Tattered Tag 

Wednesday, February 22, 2012

Cake Batter Rice Krispies

When I saw this recipe here, I knew I had to make it.

Seriously, cake batter and Rice Krispies?

I have made cake batter truffles before and they were delicious, so I thought how can I go wrong with yet another cake batter recipe? Turns out, I couldn't!

So, I gathered up the ingredients...


What you need:

5 to 6 Cups Rice Krispies Cereal
3 Tbsp. Butter
2/3 Cup Yellow Cake Mix
1 10oz Bag Mini Marshmallows
Optional: Sprinkles

What to do:

Melt butter in a large nonstick saucepan over low heat and then add marshmallows.


Add the cake mix once the marshmallows start to melt. Once the mixture is all melted together you can go ahead and throw in the cereal. If you are using sprinkles you can throw half of them in there too. 

Press into a baking dish. You can use any size, we used an 8x8 and it worked great. Then, if you want sprinkles, put the other half on top. Let cool before cutting into.

I used sprinkles but you can't see them. Bummer. So then, I sprinkled some extra cake mix over the top of ours. It was pretty tasty!


Garrett and I both agreed that these were the best Rice Krispies treats that we had had. That's sayin' something!


I hope you have all had a great week so far! 2 more days...


Thursday, February 16, 2012

Fried Pickles


Heloooo blog friends!!

In my super bowl Sunday post (here) ... AKA forever ago...I mentioned that I was going to share our recipe for fried pickles.

Then I got lazy.

So....10 days later, here it is!!

What you need:

  • 1 small to medium jar of Hamburger Dill Chips (Pickles)
  • 1 egg
  • 1/2 cup milk
  • 1 Tbsp. Worcestershire sauce
  • Salt and pepper to taste
  • 1 1/2 cups flour
  • Frying Oil

What to do:
  
1. In one dish mix the egg, milk, and Worcestershire sauce. Beat them together with a fork to mix well. Get your fryer/oil ready!
  
2. In another dish mix the flour, salt and pepper.


3. Dip each pickle into the egg mixture then into the flour mixture. Repeat.


4. Wait until you have a large enough batch and put them all into the fryer at once. Let them fry until they are golden brown!
  
5. Remove them and start your next batch. We usually go ahead and make the whole jar but you don't have to. When you remove them from the fryer just drain them on a paper towel. 


Garrett loves them with Ranch dressing, and I think most other people do too, but I like them just as they are. They are delicious. 

If you are like me when I first saw/heard of these and think they sound weird; give them a try and let me know what you think! I think you will love them!

Sharing at these sweet parties!

Thursday, February 9, 2012

Treasures from a Chocolate Cookbook: One Bowl Brownies


Welcome to the third installment of "Treasures from a Chocolate Cookbook"! I hope you guys have enjoyed the chocolate recipes I have been sharing as much as I have enjoying making them, eating them, and blogging about them! I have been looking forward to the weekends now just so I can try out a new recipe. 

Last weekend we made One Bowl Brownies. They were great for the Super Bowl as well as a late night bowl-of-ice-cream-and-brownie treat. The best thing about them: they are SO easy to make!


What you need:

4 Squares of Baker's Unsweetened Chocolate
3/4 Cup Butter
2 Cups Sugar
3 Eggs
1 Tsp. Vanilla
1 Cup Flour
1 Cup Chopped Pecans

I just noticed, as I am typing this recipe, that I used semi-sweet Baker's chocolate instead of unsweetened. Maybe that's why mine were so sweet? Oops! Either way they were good!

What to do:

Heat oven to 350. As always, right? What's this magical 350 number anyhow?

Line 13x9 pan with foil and spray with cooking spray. This is to help them not stick as well as to help you lift them out if you want to cut them before serving.

Microwave chocolate and butter on HIGH 2 minutes or until butter is melted. Stir until chocolate is completely melted. Stir in sugar and blend in eggs and vanilla. Add flour and nuts; mix well. Pour into prepared pan.
Bake 30 to 35 minutes or until a toothpick inserted comes out with fudgy crumbs. Don't overbake!


These brownies are really moist, sweet, and light. Typically I love thick, not so sweet brownies, so these were a good change up!The hubster especially loved them because he prefers lighter not so chocolatey brownies. Give 'em a try and let me know what you think!


Monday, February 6, 2012

Our Snowy Super Bowl Sunday Weekend

Goodness gracious it snowed alot here this past weekend! I think overall we got about 16 inches. I don't know about you, but for us that is alot of snow. I guess since we come from Texas anything over a couple of inches is crazy.

Friday me and my unlucky self had to venture out at 5:15am to head to work. That was a royal pain in the ass. My hands were sore when I got there from gripping my steering wheel so tight. Tahoe's aren't the best for driving on icy roads. Add a girl behind the wheel who isn't used to icy roads and it's even worse. I was flying to work at the good 'ol speed of 20mph. 

My lucky husband got to take the day off and do his schoolwork from home so when I got home from work he was there.  That was SO nice! 

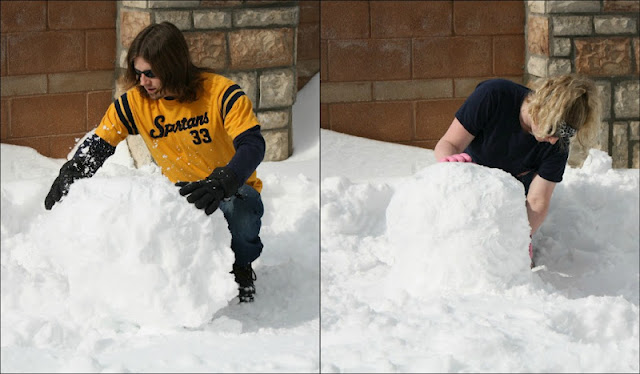
Saturday he talked me into going outside and making a snowman.


Proud of his hard work.


He pretty much made the snowman while I took pictures. Good work hun!


This is what I was doing while he was busy lifting heavy balls of snow.


* Thank you Dad for the hat!* 


This snow was deep! I am 5'10 and it went over my knees!


Saturday night we made another "treasure" from our chocolate cookbook. Recipe coming soon!

Sunday was Super Bowl day. We did the American thing and made fried pickles (recipe also coming soon), and wings and laid in front of the TV for most of the day.

If you have never had fried pickles you must try them!


My husband the Chef. He made delicious wings!


We hope you all had a great Super Bowl Sunday weekend!!

Linking up here:

A Creative Princess

Thursday, February 2, 2012

DIY Scarf Storage

Hi guys!

It's almost Friday!!! Thank goodness!

Today, I wanted to share a little DIY project that is super easy and very useful. At least it is if you have a ton of scarves like I do. I had been keeping all of them in my bottom dresser drawer which equaled me never wearing them because they weren't in my sight. You know..."out of sight out of mind". Too bad my chocolate chip cookies in the pantry don't behave in the same way. Damn them.

All you need for this project are:

  • Scarves
  • Hangers (1 to 8,793 depending on how many scarves you have. I needed 3.)
  • Shower Curtain Rings

I found these shower curtain rings at a thrift store for like 50 cents! SCORE!


Oh, you also need a cat who is willing to help. That's always nice. And adorable. : )


Now all you do is loop your scarf through the shower curtain ring and then clip it onto the hanger! BAM! You are done!


Then just hang it in your closet. Now, hopefully I will wear my scarves a little more since they are visible!


I hope this little DIY project inspired you to gather up all of your scarves and hang them where they will be seen and worn more often. Scarves are just too cute to be thrown into a drawer!

One more day until the weekend!!